


You can find the LED Truck Roof Cab Lights (35-018) here
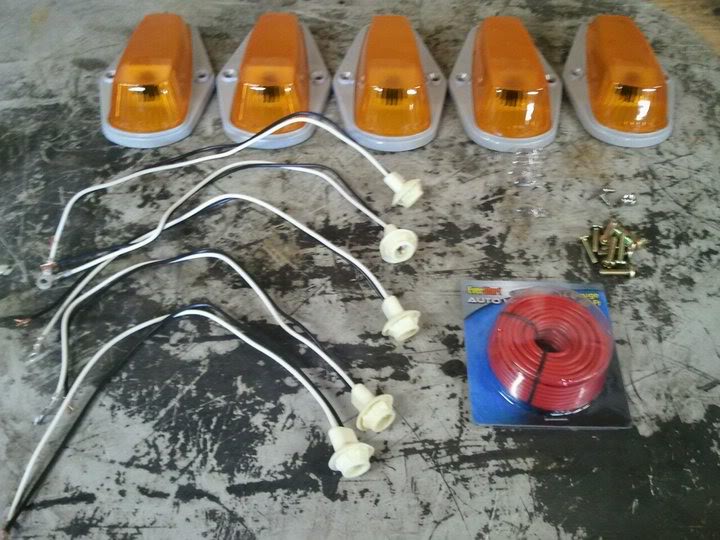
This Truck Roof Cab LED Light is a highly customizable universal fit product so you can install this set-up on practically any truck, SUV, or RV. If your vehicle does not already come with roof cab lights, you will need to drill holes in order to proceed with the wiring and mounting. This product comes with 5 truck cab lights, gaskets, wire harness, and a dash mount switch with indicator light.
Required Tools:
Automotive paint tape
3/4" sheet metal screws
16 gauge red wire
Crimpable wire connector
Male Connector
Female Connector
4 Scotch Locks
Wire Stripper
Philips Screw Driver
Sharpie
Tape Measure
Drill
Drill Bits
Step 1: Get your automotive grade paint tape and horizontally run the tape from one side to the other. This is to mark where you will be placing your LED roof cab lights.
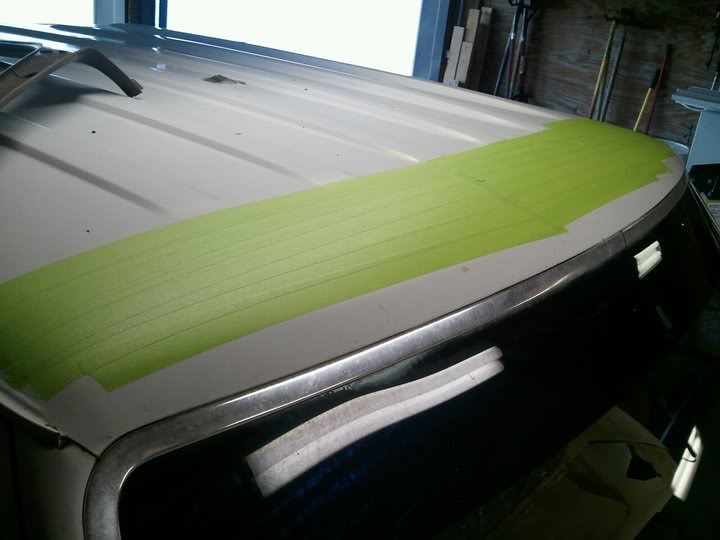
Step 2: Get a Sharpie and tape measure. Measure three 3 3/8" from the edge of the front windshield on the roof. Repeat every 6" or so and connect all the marks. Be sure you follow the contour of the windshield.
Step 3: Measure 6.5" from driver side drip rail and mark it perpendicularly from the horizontal line. This X will be the center of your cab light.
Step 4: Repeat on passenger side by measuring 6.5 inches from the drip rail cover. Mark that to indicate the center of the passenger cab light.
Step 5: On the center of the left and right cab light, measure 12" and make a mark. That will be the center of the cab lights. Repeat for every leftover light.
Step 6: Time to drill the holes. Before you make any permanent modification, make sure that this is exactly where you want everything to be. You can drill holes, but you certainly cannot un-drill holes!
Get your drill and the right drill bit size. Place your lights over the marks and use your sharpie to indicate where the screws should be. Start drilling. You will have 10 holes when you're done.
Step 7: Get a larger drill bit that has the clearance space of two wires. Drill a hole in between the two holes per cab light so that you can run your wires. You will have 15 lights when you're done.
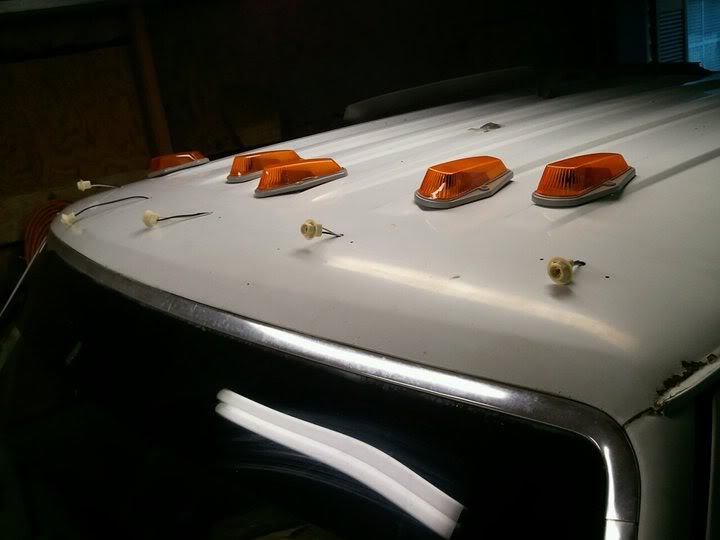
Step 8: Remove the truck's headliner and start wiring up the lights. Run the lights through the larger center hole for all five lights.
Step 9: Ground the ground wire to inner part of the cab roof. Run the red 16 gauge wire from driver side to passenger side. Use the crimpable wire connector to connect the driver side cab light wire to the red wire. Scotch lock the rest of the lights to the red wire.
Step 10: Run the wiring and tape it to the cab roof. Run the single red wire down the A pillar of the passenger side.
Step 11: There will be an unused wire connector under the kick panel. Do a test light without the headlights and also with the headlights. If you get power with the lights on, you have the right connector.
Cut that wire off and connect the cab light wire to this wire. Splice back both wires and use your male and female connector to connect them both.
Step 12: Test the cab lights to make sure they're in working condition. Reinstall your headliner and trim.
Step 13: Install new LED roof cab lights with a Philips screwdriver.
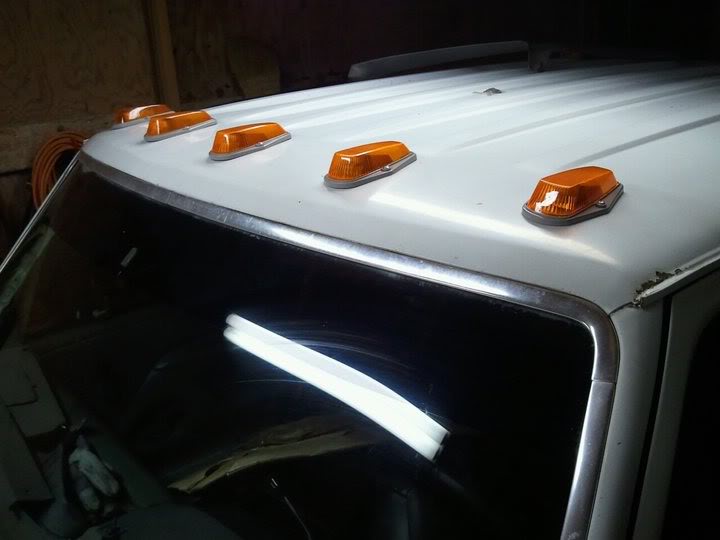
Test again to make sure everything works and enjoy your new LED truck cab roof lights.
Special thanks to Cincinnati Guy from OilBurner for this informative guide.
You can find the LED Truck Roof Cab Lights here
This Truck Roof Cab LED Light is a highly customizable universal fit product so you can install this set-up on practically any truck, SUV, or RV. If your vehicle does not already come with roof cab lights, you will need to drill holes in order to proceed with the wiring and mounting. This product comes with 5 truck cab lights, gaskets, wire harness, and a dash mount switch with indicator light.
Required Tools:
Automotive paint tape
3/4" sheet metal screws
16 gauge red wire
Crimpable wire connector
Male Connector
Female Connector
4 Scotch Locks
Wire Stripper
Philips Screw Driver
Sharpie
Tape Measure
Drill
Drill Bits
Step 1: Get your automotive grade paint tape and horizontally run the tape from one side to the other. This is to mark where you will be placing your LED roof cab lights.
Step 2: Get a Sharpie and tape measure. Measure three 3 3/8" from the edge of the front windshield on the roof. Repeat every 6" or so and connect all the marks. Be sure you follow the contour of the windshield.
Step 3: Measure 6.5" from driver side drip rail and mark it perpendicularly from the horizontal line. This X will be the center of your cab light.
Step 4: Repeat on passenger side by measuring 6.5 inches from the drip rail cover. Mark that to indicate the center of the passenger cab light.
Step 5: On the center of the left and right cab light, measure 12" and make a mark. That will be the center of the cab lights. Repeat for every leftover light.
Step 6: Time to drill the holes. Before you make any permanent modification, make sure that this is exactly where you want everything to be. You can drill holes, but you certainly cannot un-drill holes!
Get your drill and the right drill bit size. Place your lights over the marks and use your sharpie to indicate where the screws should be. Start drilling. You will have 10 holes when you're done.
Step 7: Get a larger drill bit that has the clearance space of two wires. Drill a hole in between the two holes per cab light so that you can run your wires. You will have 15 lights when you're done.
Step 8: Remove the truck's headliner and start wiring up the lights. Run the lights through the larger center hole for all five lights.
Step 9: Ground the ground wire to inner part of the cab roof. Run the red 16 gauge wire from driver side to passenger side. Use the crimpable wire connector to connect the driver side cab light wire to the red wire. Scotch lock the rest of the lights to the red wire.
Step 10: Run the wiring and tape it to the cab roof. Run the single red wire down the A pillar of the passenger side.
Step 11: There will be an unused wire connector under the kick panel. Do a test light without the headlights and also with the headlights. If you get power with the lights on, you have the right connector.
Cut that wire off and connect the cab light wire to this wire. Splice back both wires and use your male and female connector to connect them both.
Step 12: Test the cab lights to make sure they're in working condition. Reinstall your headliner and trim.
Step 13: Install new LED roof cab lights with a Philips screwdriver.
Test again to make sure everything works and enjoy your new LED truck cab roof lights.
Special thanks to Cincinnati Guy from OilBurner for this informative guide.